Category Archives: C#

Unity3D ReorderableList from Rotorz

I wanted to use a List<> object to contain my level information, allowing me to adjust/edit the level data within the editor.  In the past I’ve used CSVs & Excel to create a text list for level information, even using Google Docs to keep an online copy and download it directly into the App when it changes.

This time I wanted to use a GameObject with a bunch of properties and hooks to materials/prefabs that are used to populate each level.  Not sure if it’s the best way to do this, but I like experimenting with various approaches so I can learn what works & what doesn’t.

Then I’d create a list of these level objects in the order they will be used in the game, so if I reuse the same level data, it only needs to exist once, but will occur twice in my list.  The problem I ran into was that editing the list was a real pain.  Unity, by default, will let you duplicate an entry, delete an entry, and overwrite an entry.  Not very flexible.

After a little Google-Fu I came across an editor extension that lets you manipulate a list in the editor with a lot more control.  It’s open source and has great documentation.  You can find it at https://bitbucket.org/rotorz/reorderable-list-editor-field-for-unity/overview.

Screen Shot 2015-06-12 at 10.09.03 PMI was able to use it in my project and created a custom editor object that allows it to operate on my list.  You can see from the attached screenshot, that it gives me all the control over the list that I’d want.

I can drag & re-order the entries, I can add new ones, delete existing entries, and even use the handy pop-up for additional actions.

I great tool that will speed up my level editing plans.

Kudos & Thanks to the Rotorz guys.
 

Legacy Animations and Looping

Quick note to self…

When using legacy animations in Unity, make sure you set them to loop (if that’s what you need), otherwise they play once & stop.  Spent more time trying to figure this out than I’d like to admit.

Pretty simple to do:

	animationController = GetComponentInChildren();
	animationController.wrapMode = WrapMode.Loop;

You might want to check that animationController isn’t NULL before you update wrapMode.

Rigidbody, Collisions & Unity3D

Working on a new game app, and I wanted to know when my player object collided with a crate.  Thought I did everything right, but it turns out I was missing on critical thing.

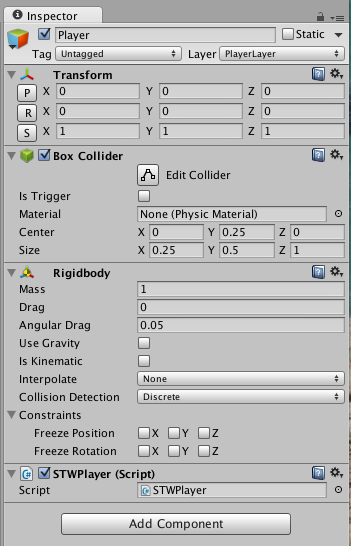
Screen Shot 2015-06-06 at 8.29.49 PMMy player object had a rigidbody, neither gravity or kinetic were checked.  I added a box collider and scaled it to enclose my 3D player object.

The crates had a box collider with trigger checked, but no rigidbody.  My thought here was as I had one player and upwards of 60 crates in the scene, I could get away with one rigidbody instead of 60 which would save memory and maybe some execution time without any drawbacks.

The game has the crates moving towards the player and the player doesnt move (at the moment).

Turns out when you do this, the rigidbody attached to the player will ‘fall asleep’ and not detect any collisions.  Took me quite some time to figure that out!  To correct it, you could add a zero force to the rigidbody, or just call the WakeUp() method.  I chose the later method by adding the following two lines in my player’s Update method:

		if (rigidbody.IsSleeping())
			rigidbody.WakeUp();

That solved my problem, and my player now generated OnTriggerEnter calls!  Hopefully this post will help save someone else from the same hair-pulling exercise!

Sliced Sprites

As part of my Candy Bubble Drop makeover, I was told that my ‘Rainbow’ shader didnt cut it, and so I was given a pre-rendered set of sprites with the bonus text lines nicely done up.

AS TEXT REWARD

While this was really nicely done, I would need to slice it into horizontal pieces with each word saved to a separate PSD file.  Being lazy, and thinking this wouldn’t be the only time I’d want to do this, I set about creating a custom NGUI Sprite that allowed me to specify a slice height, and then a slice index, so I could chose which horizontal slice I’d display at run-time.

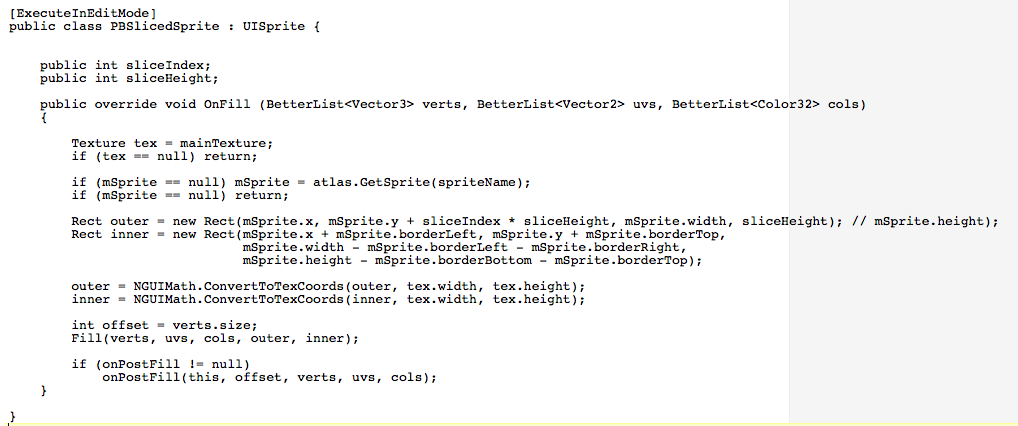
Creating the custom NGUI sprite class was pretty straight forward.  I added a new script to my Unity project called PBSlicedSprite.cs and added the following lines:

Screen Shot 2015-06-01 at 5.22.10 PM

I basically just overrode the normal OnFill method, and used the sliceHeight as the sprite’s height, and the sliceIndex * sliceHeight to offset the starting position.  Note, that as this is an internal class (i.e. used by me) there is no error checking on the index, so negative or large values will have curious results.

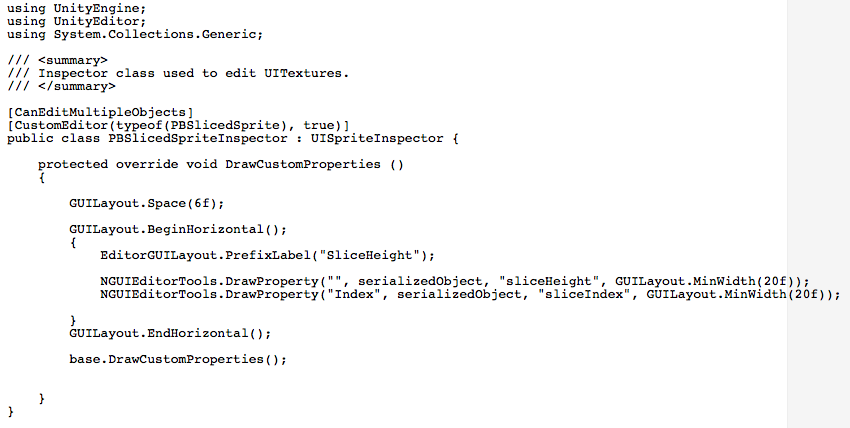
With the class created, I needed to create a custom inspector for the class as NGUI will not display public vars in one of its fancy inspectors by default.  After a little research looking at other NGUI inspectors, I came up with the following:

PBSlicedSpriteInspector.csScreen Shot 2015-06-01 at 5.25.11 PM

That inserts a line before the standard NGUI sprite panel in the inspector, allowing me to enter the slice height and the index in the editor, and adjust them in code.

I’m happy with the end result, and I’m pretty sure I’ll find a use for this class in future projects.

Let me know if you have any questions or comments.